
Blurry Photos – How to avoid them
Blurry photos with blurry subjects are usually never a good look.

Find out how you can avoid blurry images in the following quick video I recorded on the subject. Share in the comments section below if you have any tips for avoiding blurry images.
How to Photograph Christmas Lights and Decorations
This is post from last year – just giving it a little bump – ’tis the season ‘n all!

I’ve finally got my tree and my decorations up. I know, I’m super slow but as my daughter’s birthday is in December we try to keep things separate so we don’t decorate for Christmas until her celebrations are through. This leaves everything a bit rushed so I’m kinda late getting around to trimming the tree and taking pictures of it but hopefully I’m not too late in sharing these tips with you on how to take some beautiful Christmassy pictures of your lights and decorations.
1. Turn off your flash. That’s right. Do not use a flash when shooting any kind of Christmas lights or anything that is illuminated for that matter. Most digital cameras will allow you to turn off the flash by way of a shortcut button on the back of the camera body although you might have to move out of Auto mode into P to manually override your Auto flash. This will depend on your camera model – dig out that manual if in doubt!
2. Raise your ISO. This will make your camera more sensitive to low light and give you a better chance and getting those beautiful sparkly lights. Again the ISO is usually controlled by a shortcut button on the back of your camera and how you can raise it will depend on your specific model. I suggest using an ISO rating of 800 to capture indoor Christmas lights.
3. Keep steady. Because you have turned off your flash, the camera now has to do something to let more light in and in most cameras that’s going to be slow the shutter speed down. When this happens, any kind of movement or camera shake will blur your image so use a tripod if you have one. If not improvise with a stack of books a table or anything steady to rest your camera on
4. If you want to take a picture of your little ones in front of the tree try using the night portrait mode in your cameras scene modes. You’ll recognize this icon as it has a little image of a person with stars. This is a combination of a slow shutter speed so that the twinkly lights are correctly exposed and a burst of flash to correctly expose your subject. It gives a great effect and its one of the only scene modes that I recommend to my students to use.
5. Get up close. Fill your frame with lights and close-ups of specific ornaments so that there is no doubt about what you are trying to capture. You may want to switch your camera to Macro mode to allow you to get super close.
Have fun trying to capture that Holiday feeling!
Merry Christmas
Ingrid
Halloween Photography Tips – Using Exposure Compensation
This is an old post I thought I’d give a little bump – ’tis the season ‘n all 🙂
There was great excitement in the Owens house last night when we carved out the pumpkins which have been sitting on the porch since last weekend’s visit to the pumpkin patch. I have to say that I love this American tradition! In Ireland, Halloween is more about fireworks and bonfires than pumpkin carving. Anyways, when we were finished making our jack-o’-lanterns we had, of course, to take photos and I thought that it would be a great opportunity to show you how sometimes, even when shooting at night, it’s better NOT to use flash. Continue reading
3 Tips on Focusing on Difficult Subjects
This post was inspired by reader Cassandra who wrote
“I just bought the P510… love love love it. Shot the moon- can’t believe the clarity. Shot a deer in the woods… couldn’t get it to focus past the tree branches- how can I focus on the subject during superzoom when there are objects nearby that the camera prefers to focus upon? help! “
This is a really common problem for DSLR users, Bridge Camera users and Point and Shoot camera users alike. The main difference between them being the choice of focus modes available to each. The Focus Mode allows you to change how the Auto Focus system determines where the focus should be in the frame. In DSLR cameras you also have the option to focus manually. Let’s look at 3 tips which will help you with focusing on difficult subjects.
Focus Points
1. Check your user’s manual to see how many focus points you camera users. The focus points are the little red or green blinking lights you’ll see inside the viewfinder or on your LCD screen when you half press your finger on the shutter button right before you actually take the picture. DSLRS and some Bridge cameras will actually let you select which one of these focus points you would like to use. The default setting is Auto Focus Point selection where the camera choses what IT thinks you want to be in focus. 90% of the time it gets it rght as it usually focuses on the closest thing or the largest thing in the frame.
But if you are trying to be a little creative, this may not be what you want to focus on . This is especially true if you are using a large superzoom where you might be focusing on something really far away , through trees or slightly obscured by something in the foreground. In this case you might find it best to select the Center Auto Focus Point. That way you know that only whatever is in the centre of the frame will be in focus. Again check your user manual to see how to do this for your particular camera model.
Focus Lock
2. But what happens when you don’t want your subject to be dead center of the frame. Afterall don’t we all hear about the Rule of Thirds for a pleasing composition? That means your main subject needs to be off center a little. In order to focus on off center subjects you have a couple of choices. If your DSLR allows it you can select a focus point that is over the subject that you want to focus on. You will have to consult your specific user manual to find out how to do this . Alternatively you can use the Focus Lock Method.

The Focus Lock Method is where you –
- focus on your subject with the focus point set to the center.
- Then hold your finger on half way on the shutter button. (If you haven’t noticed before, the shutter button of your camera has a point half way where focus is obtained and then you fully depress the shutter button to take a picture. )
- When you keep your finger held on the shutter button half way down the focus is locked on your subject. You can then recompose your shot to the left ror the right, up or down to reframe your subject the way you wish.
- Then fully depress your finger on the shutter button to take the picture.

Moving Subjects
3. The first 2 tips work very well for stationery subjects or at least those that aren’t moving too fast. If you find yourself shooting at your kids’ T-ball game, it may be a little harder to focus on a moving traget using the methods outlined above.
This is where you need to change Focus Modes. Again, you will need to consult your manual on how to do this for your particular camera model.
In Canon you’ll be changing from One Shot to AI Servo mode and for Nikon it’ll be AF-S to AF-C.

You can now lock your focus on your subject and keep shooting while the camera will constantly readjust the focus on your subject as you press the shutter button. Makes catching toddlers on the move so much easier!
Happy Snapping
Ingrid
P.S. For lots more in depth information about how to use your DSLR to the max check out my newly revised online “Master your DSLR” course.
10 Tips for Great Fall Photos

There is very little that you can do wrong when faced with the wonderful beauty of the red, amber and golden foliage that fall bestows on us for a few weeks this time of year. Sometimes however, our pictures fail to live up to the beauty we saw in reality. Here are 10 tips to make sure what you see is what you get.
1. Shoot during the golden hours.
You’ve probably heard me talk about the Golden Hours before. This is the first hour after sunrise in the morning and the last hour of daylight in the evening when the light is at it’s richest. This will in turn give you the best light for shooting. It’s definitely worth your while to get up that little bit earlier just to see the impact that the light will have on your image.
2. Shoot after the rain.
This is another time when the air is at it’s clearest and hence the light has a great quality to it. It can also be really interesting to see how the we leaves reflect and play with the light.
3. Don’t forget about general composition rules .
This is the biggest mistake people make when shooting Fall Colors. They get so overwhelmed by the beauty surrounding them they forget things like using the Rule of Thirds, having a definite focal point and using lines to draw the viewer’s eye into the picture.
4. Don’t clutter your image with unnecessary stuff.
Keep it simple perhaps by concentrating on a few leaves or interesting trees.
5. Vary your angle
Look up into the trees and don’t forget the leaves on the ground.
6. Make use of contrasting colors.
Red berries contrasting with green leaves, orange leaves backdropped against a blue sky
7. If your sky is not a vibrant blue, then just omit it from your pictures.
Best to leave it out rather than have a dull washed out gray sky.
8. If your shooting with a DSLR,use a polarizer.
This will really help to saturate your colors.
9. Don’t forget to play around a little in Post Production.
Every image can benefit from a little tweaking in your photo editing software.
10. Have fun
and get out there before the display is gone again till next year
Got any more tips?
Please share them in the comments below.
Happy Snapping
![]()
Taking Better Food Photos
It’s hot in Georgia during August. Too hot to be slaving over a hot stove and that’s for sure. That’s one of the reasons why we’ve been firing up the grill so much over the last few weeks. My hubby is a real “Grill Meister” and loves to cook out. Suits me too as all I have to worry about are the veggies which lately have been mostly salad straight from the garden – I know, I know, I’m turning granola.
Anyways, as usual I have to incorporate photography into everyday actives and last night’s dinner provided me with a great opportunity to shoot for my new upcoming course “Better Blog Photos.“ So while Sam was slaving away over a hot grill I was setting up some great food shots.
We also seized the opportunity to try out some awesome chicken from Zaycon foods. You can see from the pics this really was some of the freshest and tastiest chicken I’ve ever eaten. And Yes… of course Sam’s grilling technique played a part of it too 🙂
Lighting
Like I’ve said many times before photography is all about good lighting and food photography is no different. One of the biggest mistakes for shooting food photography I see most people make is shooting with the flash on. This results in flat images such as this:

Food is a still object and therefore it’s easier to capture without the use of flash so I suggest turning your flash off and just using whatever light you have available to you. Remember that in order to be successful doing this you also need to hold your camera super steady or ideally use a tripod.

Already the picture is looking more appetizing and it’s only veggies 🙂
White Balance
Now we see that the next issue that we have is that the color isn’t exactly right.

The lights that most people have in their kitchen, although bright may give your photo an artificial color cast. This can be corrected in your camera by adjusting the White Balance setting.

Look for the WB icon in your camera menu and consult your manual to see what the different icons mean. Change it until you get a more natural light effect.
Composition
Now that the settings are a little better I can think about composition a little more.
Rather than hovering above the food, lower your camera and take a closer shot from a lower angle.

Now I’m getting hungry!
Just by doing those 3 simple things –
1. turning off my flash
2. adjusting the White Balance setting
3. lowering my angle of view
I’ve improved my shot dramatically. Give it a try for your next foodie pics.
If you’d like to try out Zaycon food’s convenient food service, save some bucks as well as experience great food like the chicken above, you can check out their site here to find out more information. They have a pretty unique concept going on and it’s a great money saver.
If you’d like more detailed information on how to take better photos like this then watch out for my new course “Better Blog Photos” coming soon!
Happy Snapping
![]()
How Changing Aperture affects Depth of Field
Although I have many titles I am of course, a mommy first and foremost. The addition of my baby daughter in late April has mean’t that I have to be very creative in trying to make time to work, blog not to mention spending some fun time with my other little girl Sophie. So last Saturday I decided to roll these three things into one. We made these delish cupcakes and Sophie decorated them. She was very proud of her work, as you can see, spending 15 minutes decorating and 2 minutes devouring them!

Meanwhile I seized the opportunity to put together this mini tutorial for you on How Changing Aperture affects Depth of Field.
A lot of my students bemoan the fact that there is too much math involved in photography. And they are right – there is a lot of math!
If you get down to it, it’s all about math and physics but where would the fun be in learning about that? What about the creativity of manipulating light and dark? Evoking emotion in your viewer. Perfecting your art?
So let’s get visual and forget about the math for a minute. What I want to demonstrate here is how I can alter the Depth of Field by Changing Aperture settings on my camera.
Depth of field refers to the zone of acceptable sharpness in a photo.
I took the following pictures of Sophie’s cute cupcakes in succession, everything(ISO and Shutter Speed) else been held constant, just changing the aperture of each shot.

You can see how increasing your f number (aperture) REDUCES the size of the opening in the lens and hence increases the depth of field – the amount of the “in focus portion” of the picture.
Your Turn!
Try this at home by lining up several similar objects – wine bottles, tomatoes, flowers, crayons – whatever you have easy access to.
- In order to make this as easy as possible for you make sure your in a well lit place
- Set your camera to Aperture Priority mode- Usually either A or Av on your Mode Dial.
- Keep your focus point set to the same point each time. In the above pictures I kept focused on the orange cupcake.
- Turn the mode dial wheel of your camera to adjust the aperture values.
- Take a shot at every aperture value or f/stop that your lens will allow.
- Pay attention to what happens to the shutter speed values as you change your aperture.
- Upload to your computer and view the images side by side. This will be much easier than trying to use your camera LCD screen to view the images.
Can you see the difference between shooting wide open with a low f/stop and shooting with a narrow aperture and a high f stop?
There is a lot more to depth of field and aperture than just this including concepts such as “The circle of confusion” – Ha! but I think we’ll stop there for now. If you get the above you’re doing good!
I’d love to see some of your shots so feel free to post them on the CameraShy Facebook Fan Page.
Happy Snapping!
![]()
Challenging Myself
 Last week I heard about the SITS Photography challenge and decided to jump on board for a couple of reasons.
1. I love the SITS community and find it an incredible resource for a wide variety of information.
2. I really needed a bit of a kick to get my photography moving again. Because it’s been difficult to move around these days due to my impending “big event” I’ve hardly been taking any pictures – a terrible shame.
3. I think because I spend so much time teaching others about photography I’ve forgotten how much fun it is to take direction from someone else and simply put myself in the shoes of the student.
So for the past week I’ve tried to put all of my “know-how” to one side and focused on following along with the SITS Spring into Action Photo challenge expertly led by Lynda Giddens. Although I haven’t been able to blog about it daily I have been keeping up with the tips and most importantly, taking pictures every day!
Here’s what we covered on days 1 and 2.
Day 1 We were encouraged to consider Perspective and Composition. We looked at changing our point of view, shooting down low, from above and from the side. We were also told to think carefully about composing our shots thoughtfully using some of the “Rules” of photography such as the Rule of Thirds.
Instead of shooting the obvious (my DD) I decided to head outside and see what I could find and this is what I came up with.
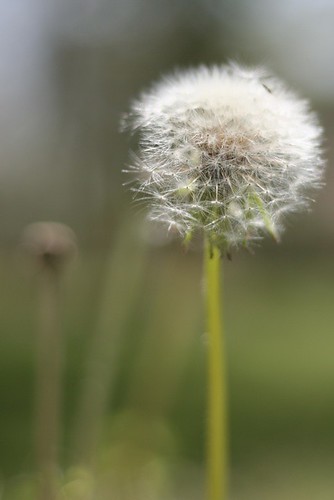
Day 2 was all about editing our pics using some of the free online photo editors out there. I have to say that I really was impressed with the options that some of these offer and I’m working on a blog post that will review some of the most popular ones.
One of the coolest features online editors have is the ability to make photo collages in seconds – literally. Here’s one I made of my dandelions.
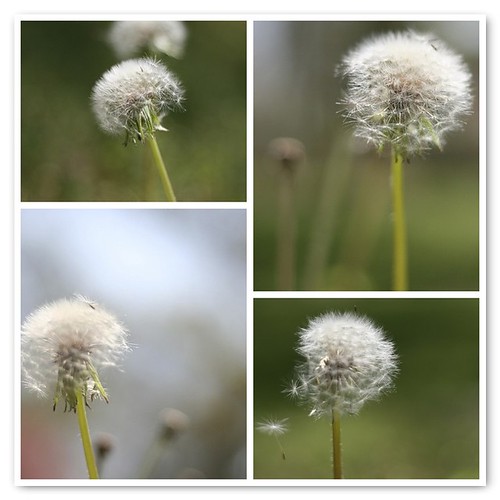
Seriously if I were to do this in Photoshop I’d be at it for at least 20 mins and this took about 2! For this one I used Big Huge Labs.
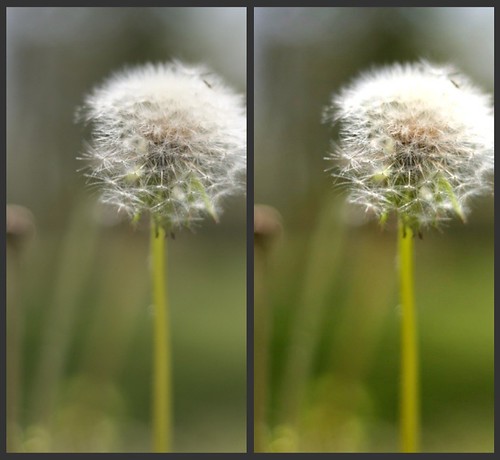
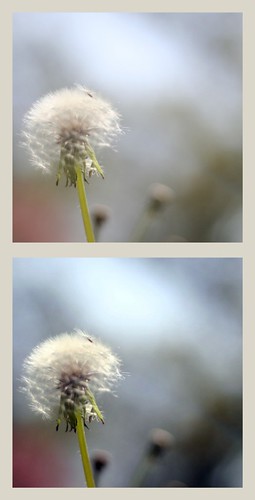
And finally I tried out Picnik. I’ve used it several times before but it was nice to give myself a bit of time just to play around in there and see what I could come up with quickly.
Here are the results showing the before and after shots:
Let me know what you think! I’m off to catch up on Day 3 and 4!
Happy Snapping
![]()
Growing As An Artist
This is a guest post by Larry Lourcey. Hope you enjoy!
 Photography used to work kind of like this…. there were the pros, who had the high-end, mega cameras and the amateurs who had point and shoots. The line between great artists and everyday shooters was pretty easy to spot. Things have changed now with digital. Technology has allowed even a part-time amateur to have a camera that isn’t much different than what the pros use.
So how do you set yourself apart from the pack? Quite simply, you do it by growing as an artist.
Now there are two components to this process – input and output. I wrote a blog article a while back about the first part. Basically, you have to feed your brain with creative nutrition if you want it to work for you.
The second part is practice. You won’t get better at photography by thinking up great concepts, you have to actually try to create them. Are you going to fail on some of this projects? Absolutely. Is your vision always going to translate to the printed image? Nope. Will it help you to grow as an artist? You bet! So where do you start?
I’m a big fan of self-assignments. What this means is that you come up with an idea and give yourself a deadline to get it done… then actually DO it. I’ll even give you a few ideas to get you started:
Do a series of self portraits. I’ve done this one and it is much tougher than it sounds. The good news is, you always have access to the model!
Grab your favorite CD and create an image to illustrate each song on the album. It can illustrate the meaning of the song or maybe just a literal portrayal of the title. Lots of wiggle room here!
Do a series of 12 portraits, each representing a month of the year.
Photograph landmarks of your hometown – just do it in a creative way.
There are literally thousands of ideas you can come up with. The concept isn’t nearly as important as the execution. Pick one and go for it. You’ll be surprised what you come up with!
*****
 Larry Lourcey is a professional portrait artist, located in Plano, Texas. In addition to his Photography Blog, he also has a website dedicated to photography education . You can follow him on Twitter at @larryphoto
Optical Zoom vs Digital Zoom – What’s the difference?
This week on the blog I did a review of the Nikon P100. I was inspired to do so because of a video my dad , Joe made about it at Diamond Imaging. You can check out the video here and see him do a hands on review of some of the best features of this camera.
One of the most powerful features that struck me is the size of it’s Optical zoom lens. You can see the pictures we took with the camera, standing from the same spot and you’ll notice how much you can see with that optical zoom lens without loosing any quality – it’s pretty cool!
Nearly every digital camera has some form of an optical zoom lens these days and it’s almost something that we have come to expect. It’s rare to see a compact camera with a fixed focus lens – usually this is left up to the camera phones although these are even beginning to have zoom lenses too.
Most camera have both an Optical Zoom lens and a Digital Zoom lens – so what’s the difference?
Optical Zoom Vs Digital Zoom
 An Optical Zoom lens will allow you to take subjects that are much further away without loosing any quality. The camera uses the true optical capacity of the cameras lenses to magnify you subject hence rendering a clear crisp image. You’ll see the size of the optical zoom of your compact camera denoted somewhere on your camera body or perhaps on the side of the lens e.g. 3X Zoom, 5X zoom, or in the P100’s case 26X Zoom.
A Digital Zoom is quite different Instead of using the optics in the camera lens to bring you closer to your subject, the digital zoom simply digitally magnifies the image that you already can see through your viewfinder. This has the same effect as what happens if you zoom in on a picture on you computer, in effect magnifying the pixels. You loose resolution or picture quality. Lot’s of compact cameras will boast a large digital zoom but in reality this means little to what your camera can do.
Most compacts have a combination of an optical and digital zoom. When buying a new compact camera always be clear if the zoom size advertised on the box is the true optical zoom or if iti is in fact the combined size of the digital and optical zoom. Some manufacturers have been known to use this misleading marketing ploy.
How do I know which zoom is working?
You can see which zoom is in operation on your camera by one of the following methods:
1. Listening – You can usually hear the mechanics of an optical zoom in action. A digital zoom is silent.
2. Look at your lens in the front of the camera – is it moving in and out? -If yes then it’s the optical zoom lens in operation. No movement while you zoom usually means you are now using your digital zoom.
3. Look for the icon on the back of your camera that indicates that your zoom is in operation. This is usually a scale with a bar illustration from W – T. (W meaning wide angle and T meaning Telephoto.) Sometimes when you begin to use your digital zoom the color of this bar will change to red. And sometimes there’s an indicator on your camera LCD screen like a dividing line showing you that you are now in your digital zoom area. Check out your own camera manual to see which one applies to you.
I always suggest to my students, to turn off the digital zoom capabilities of their camera so that they will not be tempted to use it and hence loose quality. You can do this simply by going into your cameras set up menu and turning off the option for Digital zoom.
All in all a digital zoom really doesn’t add any value to your pictures with the exception of that one time where you really just want to see what’s going on really far away from you. You might be able to make out the scene but the resulting picture will not be too hot.
My advice – if you really need to get closer then firstly – Move Your Feet!
Happy Snapping!
![]()