

Aperture Priority Mode – How to make a Blurry Background

Check out the video below about Aperture Priority Mode. Even if you don’t have a DSLR you most likely have this mode on your Point and Shoot camera.
Video Transcript
Hi there! It’s Ingrid from Camerashy. One of the questions that I get asked by my students all the time is, “Ingrid how do you make a blurry background?” A blurry background? Oh I get it, I know what you’re talking about. You want to blur the background of your photos so you get a nice creamy, dreamy background and your subject really stands out. It makes for a really nice portrait shot. I know what you want to do and it is really easy.
All you have to do is to move out of Auto Mode and move in to Aperture Priority Mode. So how do you do that? Aperture Priority Mode will be AV if you are shooting on Canon or it will be A on a Nikon, Panasonic,Olympus – pretty much everything else right?
So you want to be in Aperture Priority Mode and then turn the command dial to get the lowest aperture that you can shoot with. This would be dependent on the lens that you are using. So, don’t worry if you can’t get any lower than f/5.6 that is probably got to do with the lens that you have on there.(Check that you are using lens that has wide maximum aperture. )
So you need to shoot wide open. When you are
.
So you are out of Auto Mode but not quite in Manual but you are getting there. That’s Aperture Priority Mode!
Aperture Priority Mode really is the best mode to be in when you are shooting portraits, or photos of your kids or anything that you really want to pin point the focus and blur the background so that you can really tell the story of your image.
For more quick and easy tutorials on how to use your Digital camera, make sure to sign up on the blog and subscribe to my channel so that you never miss another video.
Happy Snapping!
Let me know if you use it in the comments below after watching the video!
![]()
Learning Photography – 3 mistakes beginners make using a new DSLR camera
1. Shooting only Auto Mode
If you switch your DSLR camera to Auto Mode do you know that you are only using about 20% of its functionality? That’s like having a zippy sports car and keeping it parked in your driveway (as one of my students rightfully stated!) Why spend all that money on a wonderful piece of photography equipment to do that? When you shoot in auto mode, the camera takes over all of the control of your camera settings. It decides on exposure, ISO, WB and whether or not you need flash amongst other things.
While you think this might be a good thing when you are just starting out, when you are learning photography you must challenge yourself a wee bit more.If you want to improve you need to move out of auto mode learn to shoot in the Creative Zone.
 Using the P, Tv (S), Av(A) and M modes correctly by controlling the settings, will bring your photography to the next level. Although every shot may not necessarily be a winner (Hey! everyone’s gotta start somewhere) you’ll be a step closer to improving your photography. Remember; we all learn by our mistakes, so don’t be afraid to make ’em.
2. Using Flash Inside
Using Flash inside is something that most people think is a necessity. In many cases this is true as the light is just too poor or your subject is a wiggly 2 year old. There are many times however that it is possible to shoot without flash indoors:
- If you have lots of natural light
- Your shooting under very strong artificial lights
- When you want to capture the lights or ambience in your picture.
These lighting conditions work well without flash especially if your subject is not moving, for example if you are shooting ingredients for a recipe.
So to shoot with out flash inside you simply need to turn it off. However, if you are shooting in Auto Mode you will have no control over when your flash turns on and pops up.
This is always the great giveaway as to when a photographer is using Auto. I’ve seen countless students who initially think the only way to keep that flash off is to press down against the pop-up action of the flash unit … eh…great way to break your camera by the way.

Go ahead and turn the camera to P and simply don’t turn on your flash.
In P Mode the flash will only pop up if you tell it to do so. The camera will make adjustments so that it will compensate for the lack of flash and you should get a correctly exposed shot. Shooting in low light can of course be improved by using better lenses and changing some other settings such as ISO but by just doing turning off the flash in P Mode you will have a good jumping off point to see which settings you can further tweak to improve shooting indoors with no flash.
If you’ve been following my blog for a while you’ve probably already taken my free mini-course on taking Better Photos where we cover all of this stuff. You can still sign up to get access to it here.
3. No specific Focus Point
When your photograph lacks a focal point the viewer of your image doesn’t know where to look in the picture and ultimately their eye leaves the image. Having a definitive focal point ensures that your photo is engaging and the viewer of the image gets what it is that they are supposed to be looking at.
Usually the Focal Point of the Image is where your FOCUS POINT is.

Your FOCUS Points of your camera are highlighted within the viewfinder as red spots (or squares) when your press your finger on the shutter button. Always make sure that your focus points are over the area of the image that you want to be in focus.
If they are not, then you can reframe your image so that this is the case or you can manually set the focus point by accessing the focus point selection function of your camera. Personally I always like to have my focus point set to the middle point. I can then use Focus Lock method to reframe my image exactly how I like it. This ensures I always know where my focus point and hence my focal point is in the image and helps to make my photos more visually stronger.
Happy Snapping

My Review of the Nadine Weekender Camera Bag for Women
I’ve just come back from a week at the beach. Lucky me eh? Well, it wasn’t all work and no play. When you work for yourself, vacations always involve a little bit of “work” so my days of hopping on a jet with merely my toothbrush and overnight bag in hand are long gone!
These days you are more likely to see me with 10 different bags for 10 different purposes. A bag for my laptop. A bag for my camera. A bag for my other electronics. Never mind the snack bag, the toy/entertainment for the kids bag and of course a sick bag for my littlest bad traveller 🙁
So you can image my delight when the kind people at Aide de Camp sent me the beautiful Nadine camera bag to review. They were adamant that I gave it a thorough testing and let me tell you, I jumped at the chance to give it a work out!

The Nadine bag is much bigger than my previous camera bags – yes – I’ve had a few! This is because not only does that Nadine comfortably fit my Canon 7D + additional lens and speedlight, it can also accommodate my laptop. And friends, my laptop is not one of these svelte wafer thin things, but a very desperate-for-an-upgrade MacBook 15″ dinosaur. And it all fit in the Nadine bag! PLUS I even had room for my external hard drive that I felt necessary to take as a back up due to the age of my computer – did I mention I need an upgrade?
Make no mistake, this mean’t that Nadine was packed to capacity but it still zippered closed no problem , with a double zip to help me out. It also mean’t that it now was quiet heavy and I wouldn’t recommend carrying this lot on a shoot, but for the proposes of my trip and having everything contained it was excellent. If I had have been hopping on a jet, Nadine even has a little trolley sleeve in the back to slip over your luggage handles to make it easy to navigate the airport. Perfect for weekend getaways.
So lets take a closer look at this beauty!
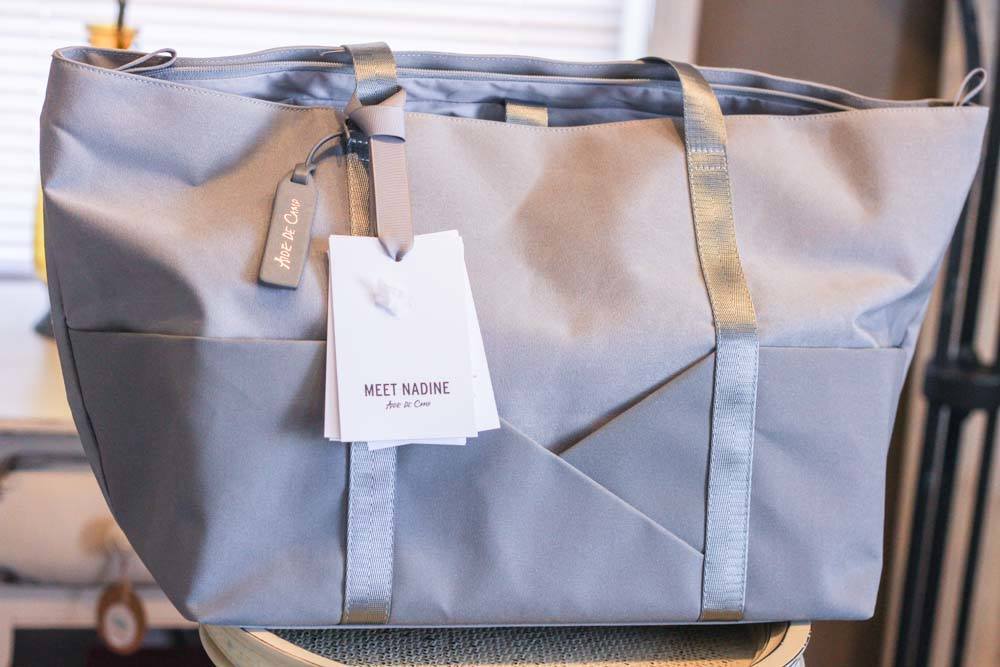
The Nadine is positioned as Aide De Camp’s Weekender bag so your getting a lot more bag than something which will only fit your DSLR. First off, she arrived beautifully packaged within her own dust bag and in a gorgeous black box. No danger of it getting damaged in transit.
Unlike my previous camera bags, Nadine is made from a wonderful lightweight but durable premium canvas material. I can’t stress enough how important this is as camera gear can get really heavy. It’s also water resistant. I have the beautiful slate color which is a delicate grey, but she’s also available in cream and charcoal. I was a bit worried that it might show the dirt but so far so good and I think a quick rub with a dampened sponge would clean up any messes.
Two long shoulder straps means that it easily carried and I found that it sat really well on my body. Because its so light weight, I would have no problem using this as an everyday bag – I love its “oversizeness” and I’m known for carrying everything but the kitchen sink in my purses!

The interior like I have said, is super roomy with several zippered pockets which I used for lipbalm, and business cards. But here’s my absolute favorite thing about Nadine. The padded camera insert is fully removable and she turns into a regular bag! This means you can cut down on yet another bag when traveling as I nearly always take a ginormous purse with me. Now I can just leave all the lenses and stuff at the hotel if I’m heading out for an evening, armed with just my cell phone in my bag for all the usual selfies 🙂
If you are a mommy with kiddos still in diapers you will absolutely adore Nadine. Not only does she have enough room to stash a few diapers and wipes and a spare change of clothes for your littles, the laptop protection sleeve can double as a diaper changing mat. Totally ingenious!

As you can see from my photos this bag really packs a hell of a punch in both functionality and style – both of which are extremely important to us ladies!
You can check out the Nadine bag here at Aide de Camp or order from B & H Photo here.
Happy snapping
Ingrid
4 Ways to Improve Composition
 An important element of improving as a photographer is learning about composition. Composition is how we put together and arrange things in a photo to make it look well balanced and artful. There are tried and tested ways of arranging the elements in a photograph to look “pleasing” to the eye and they have been used in art for centuries. Sometimes nature does this composition for us and all we have to do is point the camera in the right direction and click, but mostly we have to work a little at it to make our photos look the best they can be.
If you struggle with knowing how to best compose your photos, I want to encourage you to first of all SLOW down and think about your shot before you take it. All too often we are in a hurry to shoot and we miss things that could help bring the shot to the next level. Slowing down will help you focus on the beauty or the emotion that you are trying to capture and allow you time to think about how to best approach your shot. Slowing down will give you time to think about the following four things:
1.What do I want the FOCAL POINT of the image to be?
The Focal Point of your image is usually the most important thing in the frame. Its that end place that you want the viewer’s eye to rest on when they are looking at your final photo an it is usually the sharpest thing in your frame.

ACTION: Place the camera’s Focus POINT (red dot or black squares) over your FOCAL POINT by toggling your focus points or use the “Focus Lock and Recompose” technique .
2. WHEREABOUTS do I want to place the Focal Point in the FRAME?
Evidence suggests that placing your focal point bang slap in the middle of your frame is not a good look. One of the most widely known “rules” of photographic composition is the Rule of Thirds. the Rule of Thirds is where you think of your frame being divided into a tic-tac-toe grid. The rule suggests you should place your points of interest (including your focal point) where the gridlines intersect. A good exercise is to go through your image library and see how you could re-crop your photos with the Rule of Thirds in mind to improve them.

There are many other composition “rules” and we cover each of these in depth each month in my Take 52 PLUS membership group. Another basic one is the concept of Balance. There are many types of balance in an image one of which is when an image just ‘feels” well balanced. This could be because the visual weight of each side of the image is in check or even everything is perfectly symmetrical. Think about what might throw an image off balance for you.
Perspective is also something that can completely change the composition of your image. Taking time to consider your point of view, your choice of lens and you choice of focal distance can help you to create improved compositions.

3. How am I going to direct attention to my Focal Point?
You want to give as many clues as possible to the most important part of your image and there are many various composition techniques for achieving this. Some of the more basic things you can think about is using Leading Lines which draw your viewers eye into your image, or using a natural frame to frame your shot.
Bright highlights as they will draw the viewer’s eye towards them and shadows will generally lead the eye away from an area so be mindful about where these appear in your image.
4. What to leave in or what to leave out of the Frame
This last point is probably the one that will make the biggest difference to your photos. If something doesn’t add to the story that you are trying to tell in your image, then leave it out of the shot. Use your zoom to crop in nice and tight if your main subject is a person. Leave no question about what the main focal point of your image is. Sometimes, you need supporting information in your frame to add to the story. If this is the case, then by all means, leave it in. It’s all your call. But if something makes it into the frame, there should be a good reason for it being there!
If you would like to delve deeper into COMPOSITION theory and technique I’d love to have you join us in the Take 52 PLUS group. Its an awesome way to step up your photography game with directed monthly assignments and peer feedback from a supportive community.
Click here to find out all about this super fun monthly membership.
And if you are thinking, how on earth am I going to remember all of this stuff when it comes to taking a photo, sign up below to get your free Cheat Sheet on Composition!
Happy Snapping
Why Program Auto Mode is a Beginning Photographer’s Best Friend
I Love P! I do! Ask any of my students 🙂 I tell them all P is their best friend – their buddy, their pal! So who or what is P I hear you ask?
Ah! P doesn’t stand for Professional, ahem, as I’ve heard, ahem, at least twice before…
P = Program Auto Mode! See it up there on your camera Mode Dial?

Program Auto Mode is your best friend because it gives you all the benefits of shooting in Auto Mode such as, the camera takes care of all of the exposure decisions for you, but lets you override any setting you wish. And as you know, there are lots of other things to worry about on your DSLR or mirrorless camera other than just exposure. In Program Auto Mode you can control the Flash, the White Balance, the Metering, the Auto Focus Modes etc. while the camera makes sure you have a well exposed shot every time.
All of these things are functions of your camera that you really need to take time to learn. These will make the difference in your photography between just “blah” photos to something that you’re really proud of. And while you are learning about these things, you don’t have to worry about Shutter Speeds or f-Stops – all that is taken care of by P so you can spend your time getting to know all the other stuff while still getting correctly exposed shots.
Little Tweaks make a big difference
I believe that you should run before you can walk and using P mode allows you to do just that. Before you start manipulating the exposure get to know how your camera sets things and you will see how small tweaks can make a huge difference.
For example, look at the following two shots:


Pic outside with Flash
In Auto, the camera will never decide to pop up the flash when you are outside as it only worries about whether there is enough intensity of light or not. Using Fill in Flash when your outside will help to avoid these shadows and totally change the look and feel of your image. You can only add this pop of flash in the P mode but it is as simple as just by pressing the Flash Button on the side of your camera flash.
As you can see, using your flash outside as a Fill In Flash can bring your photos to life!
There are so many of things like this that cannot be done in Auto Mode and once you’ve been using your camera for a while you’re bound to come across these limitations. In fact, if you’ve had your camera anything more than a wet weekend (or a snowy one) I’m willing to bet you have already.
Little Clues
Program Auto Mode also gives you little clues as to how the camera is deciding to set the exposure. If you pay attention to the numbers on the back of your camera, you can quickly begin to see the exposure combinations that work best for various scenarios. This will give you a clue as to where to start when setting manual exposures.

The first number you see is the Shutter Speed and the Second is the Aperture. These two varibles will dictate the exposure along with ISO. And ISO can be controlled in Program Auto.
As your photography progresses knowing the variables will be come very important
I actually believe that getting a firm grip on ISO and its impact on your images is a great foundation in shooting in manual and P mode allows you to play with ISO and figure out this important part of the equation.
So the next time you are at the park, or messing around with the camera outside, don’t be too hard on yourself and have a go in Program Auto Mode and see what you can change 🙂
If you’d like to learn more about all the things your wonderful camera can do, then join me for a live webinar on “Simple Things you can do to Improve your Everyday Photos.”
Happy snapping
Ingrid
What does THAT button do? DSLR camera menus & buttons explained
 Its not uncommon for me to hear from students that trying to decipher the menus and buttons on their cameras is like trying to learn a completely new language. In this video I try to explain how you can easily find the function you need quickly and why you rarely even need to venture into the camera menu.
If you’d like to join the Camerashy Take 52 Photo Challenge we’d love to have ya! Click here to sign up: https://ingridkellyowens.com/camerashy-take-52-challenge/
Happy snapping!
Ingrid
How to Succeed in a Weekly Photography Challenge
 One of the best ways to improve any skill or craft is by consistent, regular practice. We could all think ourselves the best painter in the world if all we ever did was read about how to do it – but putting the brush to canvas is another matter entirely. So it is with photography. It’s quite possible to think that you’ve got this photography thing down,only to realize when you are inspired to shoot, your Apertures and your ISOs are all in a heap! The secret to getting better at photography is consistent, deliberate, regular practice.
This can sometimes be easier said than done. As cute as your kitty cat is, it’s tiresome taking his portrait all day long and what else is there to shoot? Well listen – I’ve got the answer…
The Take 52 Challenge
A great way to hone your skills is to do a weekly assignment in the form of a Weekly Photography Challenge. This is similar to Project 365 that you might have already heard of but a little less intense. The idea is that there is one theme per week which you use as your inspiration to go out and shoot. Depending on the challenge, the theme may be quite vague and open to creative interpretation or quite specific – perhaps a particular subject or technical skill. Being to told what to do takes away some of the issues you might have surrounding what to shoot and give you purpose to your practice.
But the other really nice part of participating in a weekly photo challenge is that you are not doing it alone. The camaraderie and friendships that develop in these groups is phenomenal and they provide a wonderful learning ground for people new to photography. If you think this might be something that you would be interested in, I’ve put together some of my top tips below, to help you succeed with a weekly photo challenge like the CameraShy Take 52 Challenge.
Find the right group
There are many places where you can follow along with a photography challenge – some with private Facebook groups or forums and others where bloggers just provide a link up section in the comments of their posts. Take your time to do a little research to find the right group for you. Photography is infamous for having a lot of very passionate and sometimes opinionated people and it can be super intimating for a newbie to join an established group. If you a beginner/intermediate search for groups specifically in this area, like my CameraShy Take 52 Group. (I boot out any meanies that surface tout suite!)
If your love is food, perhaps you’d love a food specific group. If you goal is to become more professional, you might consider a group with a stricter critique protocol. Facebook is a great place to begin your search, as of course is Google and Flickr is still holding its own.
If you like my style of teaching, Join The Camerashy Take 52 Challenge.

Sign up to the Take 52 Challenge!
Receive access to the private Facebook Group and get the prompts delivered to your inbox each Monday!
Read the rules
When you first join a group take 5 minutes to read the admin’s rules about how and when to post. There is nothing more frustrating than a new participant ‘spamming’ the group with tons of photos of their aforementioned cat which have nothing to do with the theme.
Read the rules, ask questions if something isn’t clear and introduce yourself to your new group of friends.
Take your time
When the theme is released each week, remember that it is not a competition to be the first to submit. The idea of being a participant is to improve your work – adding that amazing shot you took of the Tetons 3 years ago will do nothing to improve your skills only perhaps boost your ego for 5 minutes.
Take a minute to let the theme sink in with you and think about it before you shoot. Initially you may draw a complete blank but you’ll be amazed how your brain works and when you least expect it, an idea will present itself to you.
Shoot lots
When you decide to shoot your subject give a little thought to how you are going to compose your shot. Try several different ways to approach the same subject – change your aspect, the time of day, lens and of course your camera settings.
Edit and refine your image.
This is sometimes one of the hardest parts of an assignment i.e. deciding which image you are going to present. It’s tough trying to figure out what your best work is and quite often you’ll feel like you could have done so much better and quite often you are right, but just go on and submit.
Waiting on perfection can be the devastation of many artists.
Share your best efforts and keep looking forward – there’s always next week!
Share
Share your camera settings which can be found in the exif data of your image and more importantly, share your thought process too. This will help other people learn from your work and help you to clarify what your intentions were with the image.
Get involved
Be an active contributor to the group both in terms of what you submit and by helping others, answering questions and giving feedback on others work. It’s usually not a requirement to submit EVERY single week – at least I do not keep track of these things in Take 52 – so don’t be put off if your snowed in one week or you have a sick kid and cannot get out to shoot. It’s usually ok to play catch up or just to jump in again when you are ready.
Constructively critique.
If critiquing each other’s work is part of the challenge, remember to do it kindly and constructively. First read the rules which deal with critique and comments. Some people may not be open to critique at all but it’s a very necessary part of the process both for the “critiquer” and critiqued.
In my group we follow this protocol: Say something you like about the image, say something you’d change about the image and end with something positive.
It is as beneficial for the commenter as much as the critiqued party when constructive feedback is given. Receive the critique openly and in the spirit which it was given. There is always room for improvement and its good to hear how others would approach the same shot.
Taking part in a weekly challenge really is a terrific way to improve your photography skills, get inspired by other people’s work and meet some awesome people. When you actively shoot every week you will be amazed at the portfolio of work you can begin to build and you will see the improvement on your work in leaps and bounds!
It’s not too late to join the CameraShy Take 52 Challenge! Just click here to sign up and jump in where you are or play catch up if you like.
Happy Snapping!
Exposure Compensation Explained
Since I’ve moved home to this site (IngridKellyOwens.com) I’ve been spending some time going through old tutorials that I’d done in my archives and I’ve decided to refresh some of them for my newer readers out there. This tutorial is all about that little +/- button you have on your camera. The Exposure compensation button. Watch the video below to see everything it does 🙂
………………………………………………………..
This week I continue my series on figuring out some of those buttons on your camera. Ever wondered what that little +/- button on your camera is for? All cameras have this Exposure Compensation Button – point and shoots and DSLRs and understanding it can really make improvements to your pictures. Watch the video below to find out how!
Prefer to read? I’ve outlined the transcription of the video below!
Hey there! It’s Ingrid here once again from Camerashy. This week we are going to talk about another underutilized button in your camera and it is called Exposure Compensation. If you have a Canon, the exposure compensation button is this little + – minus button right here on the back. On some other Canons it is up here at the top, and on some Nikons it is up here at the top as well. What you are going to look out for is that little + button. So what does this do? Well, the exposure compensation button is your way of controlling the exposure of your shot – i.e. how bright or how dark it is and over-ride the camera settings. This can only happen if you are in the program auto mode, the aperture priority mode or shutter priority mode. If you are in auto mode, this won’t work. This is a really good way to get a feel for exposure without actually knowing what you are doing.
So why would you use exposure compensation? Sometimes you take a photograph and the camera just doesn’t get it right. It might be a little bit too dark or a little bit too bright. Just not exactly what you see with your eye. This sometimes happens when the photograph contains extremes of light. Say for example if you are photographing in snow, the camera sees all of that bright snow and the camera seems to darken your image down or likewise when you are shooting into the sun you need to overexpose the photograph a little bit.
So, how do you do this? Well you just use your exposure compensation by pressing and holding down that +- button and rotating the command dial towards the + if you want to make your image brighter or towards the negative if you want to make your image darker. So what you are really saying is, hey! Camera I see what you’ve given me but could you please make it a little bit brighter or a little bit darker? Thanks ever so much… Be sure to say it a nice way because this is one of the only times that you know a little bit more on what’s going on the camera does and we don’t want to offend :).
So, remember, you are not really controlling how the camera makes it brighter or darker. You can only do this by slowing down the shutter speed or opening up the aperture and this will ultimately affect how your image looks but it really does help to just give you a little bit more insight to what is going on with the exposure and so you are one stop closer again to using these modes in a more manual way. So, venture out of auto mode into your program auto, your shutter priority and your aperture priority mode and play with your exposure compensation to see how it affects your photos.
So, I hope you find this useful, be sure to give it a thumbs up if you liked it and share it with your friends.
Until next time…
Happy Snapping!
The Top 5 Things you need to consider when buying a new camera
 Is it too early to talk about Christmas? Nah – I’m going to run with it! It is November after all and Santa surely wants to get a little start on all those Christmas lists! So is there a new camera on your Christmas list this year? I know many of my students have been really trying hard to be good girls all year so that hubby or maybe Santa will pop something special in their stocking. A new 5D Mark iii perhaps? That nifty 50mm f/1.4 you’ve had in in your Amazon wish list for months?
If you are leaving it up to hubby to decided you might be in for a sad face on Christmas morning. The smart snap-happy lady might want to give him a few pointers in the right direction. But what if you are even struggling to figure out what you need next?
Let me help you by outlining some of the main issues I see beginning photographers face.
1. Is your body up to date?
No – it doesn’t count if you go to a Body Sculpt class at the Y every Friday morning! Cameras have changed enormously in the last 10 years and if you are still struggling along with a tiny LCD screen and hard to read menu then maybe its time for an upgrade. Features such a WiFi, touch screens and large LCD screen have become standard and you will find such an amazing change in the quality between a new T6i and the Rebel XS not only in picture quality but in ease of use.
2. You’ve outgrown your current body
Perhaps you are now happily shooting in Manual Mode and love the flexibility that it offers but you hate the fact that you have to contort your fingers in award positions just to change the Aperture. If it’s like a mini game of twister each time you take a shot, its time to level up! The mid-range DSLRS all have a second command wheel at the back which makes control exposure in manual mode a breeze. Check out the Canon 70D and the Nikon D5300 for this great feature.
You will also have a bigger body that is more robust but you will absolutely LOVE it!
3. Are itching to play with Aperture?
If you find yourself drooling over blurry backgrounds on Pinterest and wonder why your macaron images just don’t look as appetizing as the blogger next door, perhaps is because the aperture on your kit lens is severely limited. Most kit lenses only open to a maximum aperture of f/3.5 which isn’t enough to blur the background and separate your subject from the background. The answer to your problem is a lens with a wide maximum aperture. A great suggestion is the wonderful “Nifty 50 lens.” The little gem has a fixed focal length lens of 50mm which means its great for portraiture but can also open up wide to f/1.8. Which will absolutely render a beautiful bokeh (that creamy dreamy background your soul has been searching for.) It magically turns your boring, blah images into something you can be really proud of . And if you struggle with having low light a 50mm f/1.8 will be your BFF.
There is a learning curve with this lens and to get the most from it you’ll need to be shooting in Aperture Priority mode or using full manual exposure settings If you need help with this we cover all this in my Get out of Auto course. (Maybe Santa will gift you that!)

4. You need more Light PLEEEASE!
If you struggle with low light in your home – and by “low” I mean you don’t have a blissful sunroom with light pouring in all day, maybe its time to up your game with an external flash. Yes, natural light is awesome but for many people its not possible or practical to get out and shoot outside all year round. The key thing with using a speedlight as opposed to the built-in flash on your camera, is that you have the ability to tilt the flash head towards the ceiling and bounce it off there to make a large soft light. This gives you the intensity of the flash without the harsh direct-on flash.
5. It’s time to get stylish!
![]()
![]()
![]() There’s always a need for a new camera bag – who says you only have to have one? Maybe one for every month of the year! One for out and about shooting, one for shooting up that mountain on a hike, one that can do double duty as a diaper bag – I could go one – Honestly I can justify anything about “needing” a new camera bag. Many hubbys might not realize that camera bags don’t have to be canvas velcro-laden, black ugly things – they can be pretty and pink or yellow (like mine!) Check out the wide ranges available from Epiphanie, Jo Totes and Kelly Moore which are all available at Amazon.com
There’s always a need for a new camera bag – who says you only have to have one? Maybe one for every month of the year! One for out and about shooting, one for shooting up that mountain on a hike, one that can do double duty as a diaper bag – I could go one – Honestly I can justify anything about “needing” a new camera bag. Many hubbys might not realize that camera bags don’t have to be canvas velcro-laden, black ugly things – they can be pretty and pink or yellow (like mine!) Check out the wide ranges available from Epiphanie, Jo Totes and Kelly Moore which are all available at Amazon.com
 So I hope this will help you write some of your Santa list! If your nearest and dearest needs a little more guidance share this post with him on Facebook to give him a massive hint.
And if its all up to you to buy a new camera, sign up here for my Free Online Workshop being held on November 18th all about Choosing the Right Camera for You! I’ll be answering any questions you might have on all aspects of camera shopping so you can comment below with your questions or ask me live on the night!
Happy Snapping!
My review of JoTotes Gracie Camerabag
Ok ladies – have I got a treat for you! Well, it was actually a treat for me but as any girlfriend knows we can squeal together about cute shoes, cute purses and cute CAMERABAGS! Yes – have I got a new, cute camera bag!!!
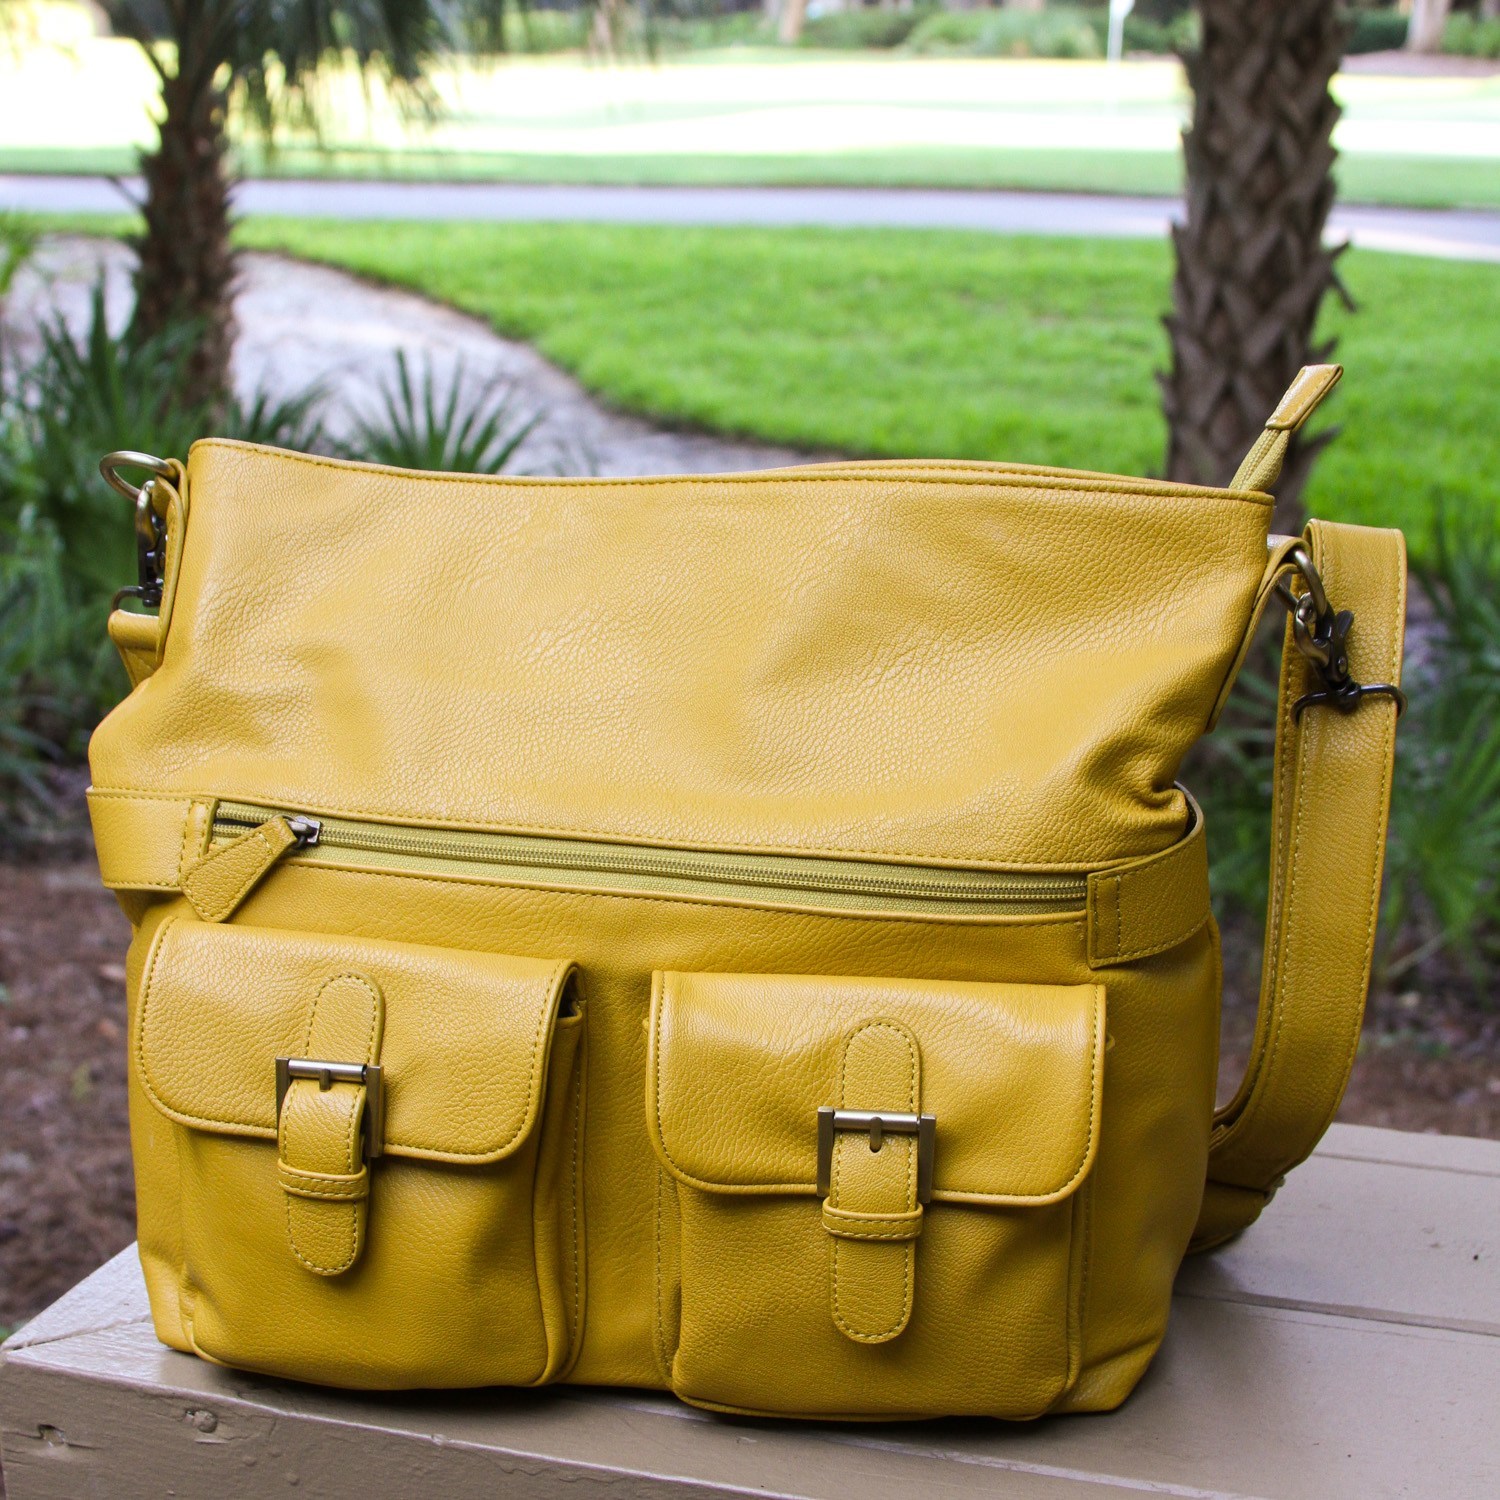
As any of my students can attest to, I am constantly searching for the perfect camera bag to hold all my gear, that is easy to carry and of course, looks super stylish. So when JoTotes sent me their beautiful Gracie in Mustard to review I was beyond excited. I was also super nervous because I was afraid it wouldn’t live up to my expectations but boy was I wrong.
Here’s a photo of the little beauty:![]()
![]()

![]()
![]()
One of my biggest concerns was space. I need a fairly sizeable bag as it needs to do double duty as a camera bag and a regular purse for a mom of littles. The Gracie is much bigger than I anticipated. It has SO much room in there for your camera, lenses speedlights ,iPad, wallet, lip balm and all the other odds and ends you might need for a day out shooting or just a family day out.
It comes with 2 straps of different lengths. currently I’m loving the longer strap and I like to wear the bag cross body style and even when packed up it still sits comfortably on my body.
It has 4 dividers inside which you can move around to suit your camera size and lenses which makes it super versatile and the lining is made of a luxurious material in light gray which makes finding things in the bag really easy.

I love love love the pockets outside the bag. Easy access to my phone, lipgloss and change and it even has a super secret little zipper pocket here in the back. Sweet!

My biggest concern about getting a JoTotes was the fact that it wasn’t a real leather bag – but hey, when I gave it more thought, would I REALLY want an expensive leather bag that could get damaged or easily marked. If one of my cute models (aka my 4 yr old or 6 yr old) spills juice or gets sticky all on the bag – a quick wipe with damp cloth or my ever at the ready baby wipe (how did I ever live before baby wipes?) sorts it out.
And check out the beautiful color. This is perfect for summer and makes me happy just looking at it 🙂 They also have so many other beautiful colors -teal, magenta, etc. That might be the hardest part of your purchasing decision with this bag!
And if I still have any guys reading thus far, you want to get serious brownie points ? Get the momma in your life a JoTotes and you will not regret it. If you can’t figure out which one to get – you cannot go wrong with the Gracie. I love it! And who wouldn’t want a new bag?
A girl can never have too many shoes, purses – or camera bags 🙂
So a big thank you to the folks over at JoTotes for this beautiful bag. Now go – run , don’t walk to get yours and let me know what colors you dig the most!
Happy snapping
![]()